
Learn, in simple steps, how to create an LLM app using Langchain and Streamlit with multiple vector stores for RAG use cases.
Introduction
Imagine you are creating a SaaS RAG application that will allow people to analyze and ask questions on their own documents. Very soon you will arrive at the point where you will need separate the documents in topics or domains. At this point, you will need to go question the architecture of your application and wonder if you need multiple vector stores.
This blog post will show how to integrate multiple vector store and solution on how to use them at the same time. More precisely, you will see in this post:
- A simple introduction of Langchain and vector store
- Deploy a RAG application with 2 vector stores
- Solutions on how to handle informations when using multiple vector stores
Let’s begin then.
Pre-requisites
- a functional Python coding environment with python and an IDE (VSCode for example).
- an OpenAI account with some credits (this is different from ChatGPT as we will use the LLM service API instead of using ChatGPT).
- Having done the previous tutorial on how to deploy a langchain streamlit RAG app (link). This tutorial will continue where the previous one has stopped so it is better if you begin from the beginning. We will not deep dive on topic like chunking or Langchain (as it was done in the other blog post) and we will go straight for the code.
What is a multi vector store strategy ?
A vector store for large language models (LLMs) is essentially a database or storage system designed to efficiently store and retrieve vectors. Basically, it allows you to retrieve the most semantically close data to the question you give.
But very soon, you will see that you need you need to separate your data into logic grouping like topics or domains. At this point, you will see that you will need different vector store or different indexes inside your vector store.
To be more precise, the vector store is the specialized database system behind the storing and the retrieval and the index are the different optimized storage of your data which are independent from one another.
When you have multiple index and want more than one, you will need to be careful for some points:
- The more information you give inside your prompt, the more difficult it would be to have a precise answer. The more information you can give to a prompt, the more stringent you have to be with the information you provide.
- Strictness is key as you don’t want to add information that is not relevant enough, which would undermine the response’s relevance.
- The more data you give in the prompt, the more tokens you consume, the more you will pay by tokens but also because you would need more and more complex models.
- A more complex model will still give you garbage answer if you do not give quality information in the context.
- If you give accurate data, you do not even need the best of the best models and can use a medium one (you do not always need GPT4 when GPT3.5 with a very well filtered context is more than enough)
So in conclusion, the relevance of the retrieved data from your indexes is the key.
Initialize the work environnement
We will use the same setup as the previous post, meaning Streamlit, Langchain, FAISS vector store and Pipenv for managing virtual env. For better readability, I will create a new folder called RAG-pipeline-multi-vector-store-langchain-app and copy inside it all the files I need from the previous post (and rename some).
cp -R RAG-pipeline-langchain-openai RAG-pipeline-multi-vector-store-langchain-app
cd RAG-pipeline-multi-vector-store-langchain-app
Now we need to install the pipenv virtual env:
pipenv installYou can now check that the web app is launching with this:
pipenv run streamlit run app.pyModify the code for a second vector store index
Ok now let’s add the relevant code in so that we can add another file in the app. This file will become our second vector store index.
First let’s change the prompt to accept another index:
template = """Answer the question based only on the following contexts:
{context1}

{context2}

Question: {question}
"""
Here we have called the data retrieved from the 2 indexes context1 and context2, but this naming can be improved.
Now let’s add 2 distinct components to accept 2 files and generate the 2 vector store index using FAISS:
first_retriever = None
second_retriever = None

st.title("First vector store index")

first_index_uploaded_file = st.file_uploader("Choose a text file", type="txt", key="first_index")

if first_index_uploaded_file is not None:
    string_data = first_index_uploaded_file.getvalue().decode("utf-8")

    splitted_data = string_data.split("\n\n")

    first_vectorstore = FAISS.from_texts(
        splitted_data,
        embedding=embedding)
    first_retriever = first_vectorstore.as_retriever()


st.title("Second vector store index")

second_vector_uploaded_file = st.file_uploader("Choose a text file", type="txt", key="second_index")

if second_vector_uploaded_file is not None:
    string_data = second_vector_uploaded_file.getvalue().decode("utf-8")

    splitted_data = string_data.split("\n\n")

    second_vectorstore = FAISS.from_texts(
        splitted_data,
        embedding=embedding)
    second_retriever = second_vectorstore.as_retriever()
This is actually still really simple, we just duplicated the first component and changed some variable names.
Now let’s add the chain that will generate the answer:
if first_retriever is not None and second_retriever is not None:
    chain = (
        {"context1": first_retriever,
         "context2": second_retriever,
         "question": RunnablePassthrough()}
        | prompt
        | model
        | StrOutputParser()
    )

    question = st.text_input("Input your question for the uploaded document")

    result = chain.invoke(question)

    st.write(result)
As you can see, we added the 2 context from the retrievers and are putting them through the chain. Simple right ?
Here’s the full code incase you missed something:
import os

from dotenv import load_dotenv
import streamlit as st
from langchain_openai import ChatOpenAI, OpenAIEmbeddings
from langchain_core.prompts import ChatPromptTemplate
from langchain_community.vectorstores import FAISS
from langchain_core.output_parsers import StrOutputParser
from langchain_core.runnables import RunnablePassthrough

# Load the variables from .env
load_dotenv()

st.title("Hello, Metadocs readers!")

template = """Answer the question based only on the following contexts:
{context1}

{context2}

Question: {question}
"""

prompt = ChatPromptTemplate.from_template(template)
model = ChatOpenAI(temperature=0, model_name="gpt-4", openai_api_key=os.environ["OPENAI_KEY"])
embedding = OpenAIEmbeddings(openai_api_key=os.environ["OPENAI_KEY"])
first_retriever = None
second_retriever = None

st.title("First vector store index")

first_index_uploaded_file = st.file_uploader("Choose a text file", type="txt", key="first_index")

if first_index_uploaded_file is not None:
    string_data = first_index_uploaded_file.getvalue().decode("utf-8")

    splitted_data = string_data.split("\n\n")

    first_vectorstore = FAISS.from_texts(
        splitted_data,
        embedding=embedding)
    first_retriever = first_vectorstore.as_retriever()


st.title("Second vector store index")

second_vector_uploaded_file = st.file_uploader("Choose a text file", type="txt", key="second_index")

if second_vector_uploaded_file is not None:
    string_data = second_vector_uploaded_file.getvalue().decode("utf-8")

    splitted_data = string_data.split("\n\n")

    second_vectorstore = FAISS.from_texts(
        splitted_data,
        embedding=embedding)
    second_retriever = second_vectorstore.as_retriever()

if first_retriever is not None and second_retriever is not None:
    chain = (
        {"context1": first_retriever,
         "context2": second_retriever,
         "question": RunnablePassthrough()}
        | prompt
        | model
        | StrOutputParser()
    )

    question = st.text_input("Input your question for the uploaded document")

    result = chain.invoke(question)

    st.write(result)
Now let’s try this new rag app. Launch the app using the following command:
pipenv run streamlit run app.pyAnd a new tab should open in your browser with your new app. You can use the following files for the test : state_of_the_unions.txt and generated_clean_energy_discourse.txt (you can also find them in the git repo of this tutorial).
You can use the following question to test your app:
- Who played a major role in defending the ukraine ? Explain to me in 10 lines
- How to better adopt clean energy ? Explain to me in 10 lines
Here’s what you should have then:
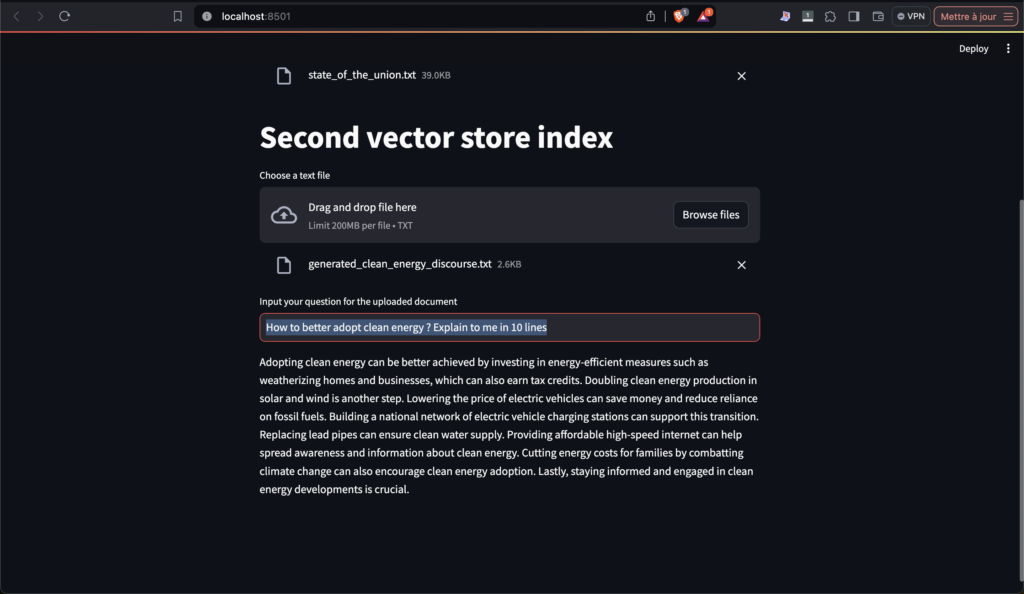
As you could see, the app is capable of answering questions and works very well. It even refuse to answer when the question is not related to any of the given documents.

Congratulation, you got a nice multi vector store index on your arm. This is really a toy app but it can be some much more and we will see some tips on how to make it better.
Limits and improvements
- This is a very simple application where, for example, the splitting mechanism is basic and may not work with other files. For real world files, you will need much more work the on documents.
- The document preprocessing will be the biggest task so that you have clean vector store indexes.
- We only have used the simplest retriever for our vector store, but there are more interesting and complex one. For example,
similarity_search_with_scoregives you a score with the researched data, allowing you to filter based on this. You could also do an hybrid search using similarity search and keywords text at the same time. - There are actually a great number of different strategies for recuperating the most accurate data depending on your use cases. This takes time to find the correct one.
- Our prompt here is very simple but what you could do is to add more information on the context. For example on what is the topic of the context you are inputing.
- Finally you could create a more complex chain where you first aggregate all the retrieved data, create a global context and then feed it to the prompt.
- You do not need to add an unlimited number of indexes, you need to be more selective and add limits if you want to have a really good cost effective app. You can check this post to better understand this concept.
Conclusion
As you can see, this is really a tutorial project and there is so much more to do but this is a good enough beginning I think.
RAG is an extremely complex because you are going to use real world data, which is inherently messy and hard to understand. This is exactly why it can provide so much value.. It is a very deep subject so it is perfectly normal if this takes time. Enjoy the learning !
Afterwards
I hope this tutorial helped you and taught you many things. I will update this post with more nuggets from time to time. Don’t forget to check my other post as I write a lot of cool posts on practical stuff in AI.
Cheers !