
You want to create a complex RAG application, add nice features like a vector store, and integrate chat history? You want to use Langchain and you are completely lost on how to do it ?
Then you have come to the right place.

Introduction
In this blog post we will create a prototype application with the following features:
- A fully featured chat with conversation history
- two vector stores created using our own files
- Integration of these vector stores using RAG to the chat
- Filters to specify the vector store and the type of response we want
- Latest best practices in Langchain code, which are actually used in production with the usage of Langchain LCEL (configurable, multi-chaining, …).
Here, you will learn to create a real-world RAG chat application using Langchain code to power your own application.” Let’s get to work!
Pre-requisites
- A functional Python coding environment with python and an IDE (VSCode for example).
- An OpenAI account with some credits (this is different from ChatGPT as we will use the LLM service API instead of using ChatGPT).
- Having done the previous tutorials on how to deploy a langchain streamlit RAG app (link), how to use multiple vector stores (link) and read our blog post explaining Langchain LCEL (link) and our post on hidden features of Langchain (link). This tutorial will assume you have the basics on RAG and Langchain and we will go straight for the code and the feature implementation.
- All the code can be found here.
A real world chat application
First, we need to define what we talk about we we say real world. There are a lot of Langchain tutorials that shows how to use this or that feature. For example, you have many tutorials on how to handle chat history in LLM call, how to use RAG, how to create your own vector stores, how to have function calling or even how to create an agent. These are the types of features you will want in your own chat application, but you will soon encounter a common problem:
How do I tie all these features together in way that is robust, scalable but still allow as much flexibility as possible ?
The answer Langchain came with LCEL. You can find a complete and simple explaination of Langchain LCEL here but we can define as a framework to build and deploy multi-step chains, from simple prototypes to complex, production-level applications.
We will use Langchain LCEL in conjonction with two other Langchain features to create our production-ready code: configurable_fields and configurable_alternatives, for which you can find an explanation here.
So let’s begin.
Features of the example
Let’s list the features we will have in our real world RAG chat app so that we have our ideas clear:
- A functional chat app
- Two vector stores created using our own files and saved locally
- The ability to choose which vector to use
- Two types of response, either simple or detailed
- Capacity to choose the response in the interface
- Capacity to use the chat history with the RAG retrieved data
These are some really nice features that would compete with any tools on the market right ?
Let’s begin right now!
Initialize the work environnement
We will use the same setup as the previous posts, meaning Streamlit, Langchain, FAISS vector store and Pipenv for managing virtual env. For better readability, I will create a new folder called create-complex-webapp-with-langchain-best-practices and copy inside it all the files I need from the previous post (and rename some).
cd create-complex-webapp-with-langchain-best-practicesNow we need to install the pipenv virtual env:
pipenv installYou can now check that the web app is launching with this:
pipenv run streamlit run app.pyCreate the configurable prompt
Let’s begin with the configurable prompt: we want two prompts, one single line explanation and one detailed and the ability to change the type at runtime.
from langchain_core.prompts import PromptTemplate
from langchain_core.runnables import ConfigurableField, RunnablePassthrough

template_single_line = PromptTemplate.from_template(
    """Answer the question in a single line based on the following context.
    If there is not relevant information in the context, just say that you do not know:
{context}

Question: {question}
"""
)

template_detailed = PromptTemplate.from_template(
    """Answer the question in a detailed way with an idea per bullet point based on the following context.
    If there is not relevant information in the context, just say that you do not know:
{context}

Question: {question}
"""
)

prompt_alternatives = {
    "detailed": template_detailed,
}


configurable_prompt = template_single_line.configurable_alternatives(
    which=ConfigurableField(
        id="output_type",
        name="Output type",
        description="The type for the output, single line or detailed.",
    ),
    default_key="single_line",
    **prompt_alternatives,
)
Here’s what is happening:
- We create our two prompts, one to have a single line explanation and the other to have detailed explanation.
- We create dict called
prompt_alternativeswhich will contain the alternative prompts and their keys, in this case the detailed one. This means the single one will be our default prompt. - We then create our
configurable_promptusing the single line template and creating alternative usingconfigurable_alternativesfor the other prompts. This function is available for all components of chains in LCEL (see the linked post if you did not yet. - The key used to choose the configurable is
output_typeleaning and its value will allow to change the prompt dynamically at runtime.
Create the configurable FAISS retriever
Now that we have the configurable prompt, we need the configurable retriever. We want to create two FAISS vector stores saved locally and be able to choose either one at runtime for our questions.
politic_vector_store_path = "politic_vector_store_path.faiss"
environnetal_vector_store_path = "environnetal_vector_store_path.faiss"


class ConfigurableFaissRetriever(RunnableSerializable[str, List[Document]]):
    vector_store_topic: str

    def invoke(
        self, input: str, config: Optional[RunnableConfig] = None
    ) -> List[Document]:
        """Invoke the retriever."""

        vector_store_path = (
            politic_vector_store_path
            if "Politic" in vector_store_topic
            else environnetal_vector_store_path
        )
        faiss_vector_store = FAISS.load_local(
            vector_store_path,
            embedding,
            allow_dangerous_deserialization=True,
        )
        retriever = faiss_vector_store.as_retriever(
            search_type="similarity", search_kwargs={"k": 4}
        )
        return retriever.invoke(input, config=config)


configurable_faiss_vector_store = ConfigurableFaissRetriever(
    vector_store_topic="default"
).configurable_fields(
    vector_store_topic=ConfigurableField(
        id="vector_store_topic",
        name="Vector store topic",
        description="The topic of the faiss vector store.",
    )
)
Let’s explain this code:
- We create a a class called
ConfigurableFaissRetrieverthat allows us to create a custom retriever. This means it should be a Runnable and so it inherits fromRunnableSerializable. - Inside it, we implement the
invokefunction which will be called by the chain (if you use streaming instead, you will need to implement thestreamfunction). - We added the variable
vector_store_topicto the class to receive the key value from the configurable that we are creating. That means, in the algorith of our class, we will use this key value to switch the vector store used in the chain. - This is exactly what is happening when defining the
vector_store_path, we use the value ofvector_store_topicto define it. This is really a basic example and we could do far more sophisticated mechanism. - Then we create the
retrieverand execute itsinvokemethod to get the retrieved data. That means when launching the invoke method of our class, it will launch the invoke method of the correct retriever. Nice right !? - Now we finally create the
configurable_faiss_vector_store, the same way as the prompt one.
Create the FAISS vector stores
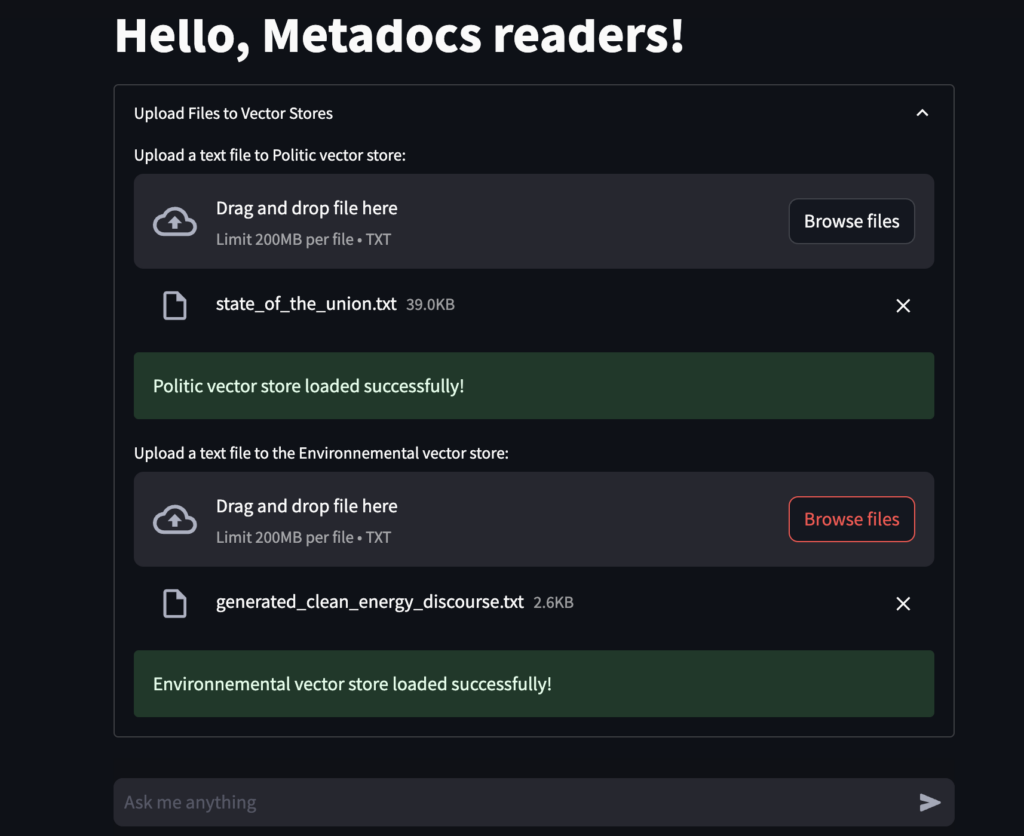
Now that we have the configurable FAISS retrievers, we need our vector store. The goal is to create vector store one time, save it locally and re-use it. We need to specify the interface so that the vector creation does not appear every time we chat.
with st.expander("Upload Files to Vector Stores"):
    politic_index_uploaded_file = st.file_uploader(
        "Upload a text file to Politic vector store:", type="txt", key="politic_index"
    )
    if politic_index_uploaded_file is not None:
        string_data = politic_index_uploaded_file.getvalue().decode("utf-8")
        splitted_data = string_data.split("\n\n")
        politic_vectorstore = FAISS.from_texts(splitted_data, embedding=embedding)
        politic_vectorstore.save_local(politic_vector_store_path)
        st.success("Politic vector store loaded successfully!")

    environnetal_index_uploaded_file = st.file_uploader(
        "Upload a text file to the Environnemental vector store:",
        type="txt",
        key="environnetal_index",
    )
    if environnetal_index_uploaded_file is not None:
        string_data = environnetal_index_uploaded_file.getvalue().decode("utf-8")
        splitted_data = string_data.split("\n\n")
        environnetal_vectorstore = FAISS.from_texts(splitted_data, embedding=embedding)
        environnetal_vectorstore.save_local(environnetal_vector_store_path)
        st.success("Environnemental vector store loaded successfully!")
Let’s explain this code:
- Here we create the two vector store using FAISS and we save it locally
- We use
with st.expanderto hide this part in the application because you are not going to create new vector store often. - This is also the way globally when you have case where you upload a file and then do RAG on them. It is better to separate the vector creation utilization from the creation as the users who use them may be different from the one using them and the rate of usage change too.
Create the Langchain chain
Now that we the vector store and the different components, let’s create our chain to tie down everything.
DEFAULT_DOCUMENT_PROMPT = PromptTemplate.from_template(template="{page_content}")


def combine_documents(
    docs, document_prompt=DEFAULT_DOCUMENT_PROMPT, document_separator="\n\n"
):
    """Combine documents into a single string."""
    doc_strings = [format_document(doc, document_prompt) for doc in docs]
    return document_separator.join(doc_strings)


CONDENSE_QUESTION_PROMPT = PromptTemplate.from_template(
    """Given the following conversation and a follow up question, rephrase the
follow up question to be a standalone question, in its original language.

Chat History:
{chat_history}
Follow Up Input: {question}
Standalone question:"""
)


def format_chat_history(chat_history: dict) -> str:
    """Format chat history into a string."""
    buffer = ""
    for dialogue_turn in chat_history:
        actor = "Human" if dialogue_turn["role"] == "user" else "Assistant"
        buffer += f"{actor}: {dialogue_turn['content']}\n"
    return buffer


vector_store_topic = None
output_type = None

inputs = RunnableMap(
    standalone_question=RunnablePassthrough.assign(
        chat_history=lambda x: format_chat_history(x["chat_history"])
    )
    | CONDENSE_QUESTION_PROMPT
    | model
    | StrOutputParser(),
)

context = {
    "context": itemgetter("standalone_question")
    | configurable_faiss_vector_store
    | combine_documents,
    "question": itemgetter("standalone_question"),
}
chain = inputs | context | configurable_prompt | model | StrOutputParser()
Let’s explain this code:
- The global Langchain chain will actually be composed of multiple smaller chains which will each tackle a specific task.
- The
inputschain will condense the question asked by the user with the chat history to create a standalone question. This will a good way to take the chat history in consideration in RAG. So as an input you have the current question and the chat history and as an output the standalone question. - The
contextchain will take astandalone_questionquestion as an input and will retrieve linked data from the given vector store. So you have the standalone question as an input and the a dict that contains the retrieved data and the standalone question as an ouput. - Inside the global chain, we just chained the two previous chains to the configurable prompt to get the output of the LLM.
- This is the way to create chains using Langchain LCEL: You split the processing in multiple chains and tied everything together in the global chain.
- But as you see, we have not specified the vector store we want to use or the type of prompt. This is perfectly normal as all the configuration will be done at runtime so you really choose the chain’s behaviour when you invoke it.
Create the chain invocation
Now that we have the chain ready, we need to invoke the chain with the parameters.
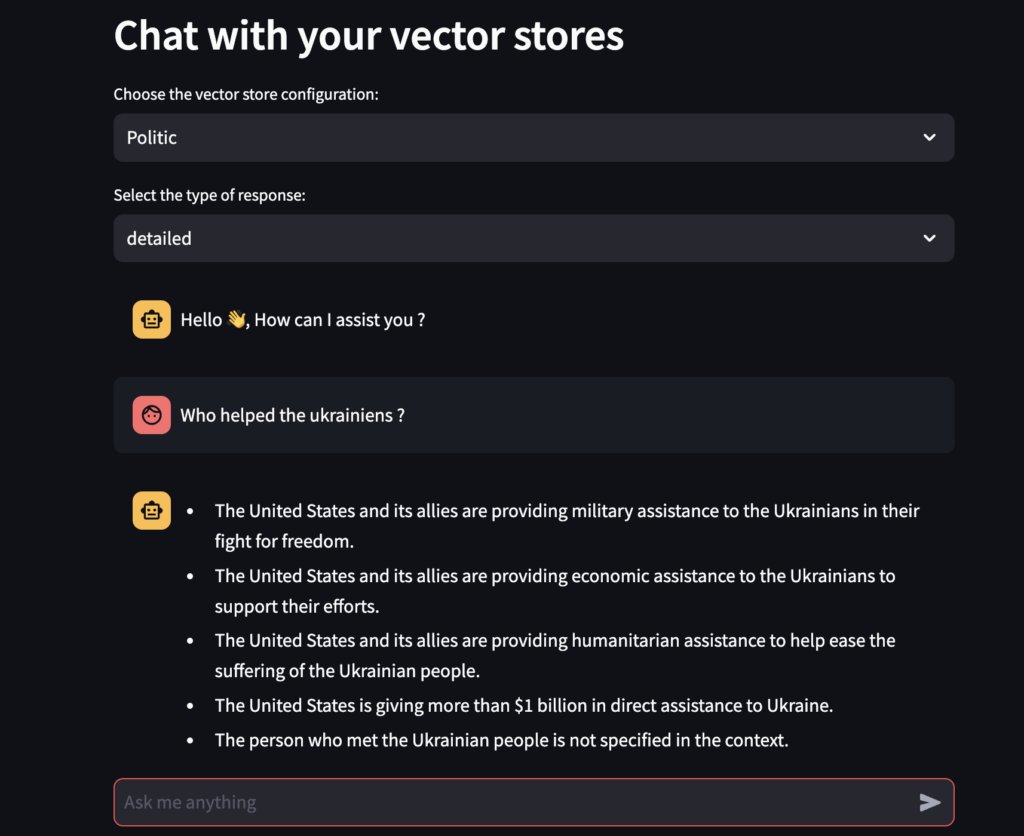
st.header("Chat with your vector stores")
if os.path.exists(politic_vector_store_path) or os.path.exists(
    environnetal_vector_store_path
):
    vector_store_topic = st.selectbox(
        "Choose the vector store configuration:",
        ["Politic", "Environnemental"],
    )
    output_type = st.selectbox(
        "Select the type of response:", ["detailed", "single_line"]
    )

    if "message" not in st.session_state:
        st.session_state["message"] = [
            {"role": "assistant", "content": "Hello 👋, How can I assist you ?"}
        ]

    chat_history = []

    for message in st.session_state.message:
        with st.chat_message(message["role"]):
            st.markdown(message["content"])

    if query := st.chat_input("Ask me anything"):
        st.session_state.message.append({"role": "user", "content": query})
        with st.chat_message("user"):
            st.markdown(query)

        response = chain.with_config(
            configurable={
                "vector_store_topic": vector_store_topic,
                "output_type": output_type,
            }
        ).invoke({"question": query, "chat_history": st.session_state.message})

        st.session_state.message.append({"role": "assistant", "content": response})
        with st.chat_message("assistant"):
            st.markdown(response)
Let’s explain this code:
- We create Streamlit components so the users can choose the vector store and the type of output he wants using
st.selectbox - We ask the user for input in:
if query := st.chat_input - When we have the input, we update the chat history:
st.session_state.message.append({"role": "user", "content": query}) - And we launch the chain by giving it the parameters and chat history:
response = chain.with_config( - In the chain invocation, there is 2 distincts parts, the
with_configpart where we give the the configuration used in the configurable prompt and vector store - And the
invokewhich is the default method used to invoke the chain with the input arguments.
Below what the app will look like. Nice right ?
Conclusion
Congratulation! You just create a super RAG chat application that is looking like something that could be used in the real world. You also learning of to use configuration to change behaviour of your chains and compose multiple chains together.
But the fun only begins now! To have a real world application that you could have user on, you will need a real web framework instead of Streamlit with features like user management, authentification but also better robustness with something better than local FAISS vector stores.
This is a tough work but as they said, Roma has not been made in one day right ?
Afterward
I hope this tutorial helped you and taught you many things. I will update this post with more nuggets from time to time. Don’t forget to check my other post as I write a lot of cool posts on practical stuff in AI.
Cheers !
Great Information Provided Thanks For The Information !
Keep Posting more!
DevOps Training in KPHB
Thank you very much!
This blog post is incredibly useful and instructive. I want to thank you for sharing this information. I also have a website with a lot of useful information.
Thank you very much!
This blog post is incredibly useful and instructive. I want to thank you for sharing this information. I also have a website with a lot of useful information.
best training institute for java in hyderabad
Thank you! I will definitely check you website too.
very nice article wonderful blog keep postingpower bi training near me
Thank you!