


Easily deploy a Langchain RAG application with Streamlit and begin prototyping right now.
Introduction
In this blog post, we are going to build a RAG application using Langchain, GPT4 (OpenAI), streamlit and python in just 10 min. We will define all these concepts and get you started with one more tool in your belt.
More precisely, you will learn in this blog post and in just 5 min:
- What is a RAG pipeline ?
- What are embeddings ?
- What is a vector store ?
- Why is a chunking strategy so important ?
- What is Langchain and why it is so useful ?
- What is streamlit ?
- How to set up an OpenAI token to use GPT4
- How to develop your own Rag application that takes as input a pdf
- Some quick tips on Rag pipeline in production
Let’s begin then.
PS: If you do not want to use OpenAI, check this link to deploy your own LLM in 5 min.
What is a RAG pipeline ?
A Retrieval-Augmented Generation (RAG) pipeline is a powerful tool that combines the best of two worlds: retrieval (finding relevant information) and generation (creating responses) in large language models (LLMs). Here’s how it works:
- Retrieval: When a question or prompt is given to the model, the RAG pipeline first searches through its knowledge base to find the most relevant pieces of information. This is like having an instant lookup feature that finds key details related to the query.
- Augmentation: The information retrieved is then added to the original query to provide a meaningful context to the language model.
- Generation: With this meaningful context, the language model generates a response or output that’s not just based on its pre-trained knowledge but also on the relevant information retrieved in the first step.
By integrating retrieval into the generation process, a RAG pipeline allows LLMs to produce more accurate, relevant, and contextually informed responses. This makes LLMs incredibly more useful, especially in scenarios where up-to-date or specific information is crucial.
But, how does the RAG pipeline find the most relevant pieces of information? It uses embeddings.
What are embeddings ?
Embeddings are a fundamental concept in machine learning, particularly in natural language processing (NLP). Basically, they are representations of words, sentences, or even entire documents converted into numerical form which are better processed by computers. They are generated by specific embedding models (same as LLM models but smaller).
Here’s a simple breakdown:
- Transformation: Imagine you have a word like “apple.” In the world of embeddings, “apple” is converted into a list of numbers (a vector) that captures its meaning based on how it’s used in language.
- Context Capture: These numerical representations are designed so that words with similar meanings have similar embeddings. For example, “apple” and “fruit” would be closer in the numerical space than “apple” and “car.”
- Usage: Once text is converted into embeddings, we can perform various operations on it, like comparing word similarity, feeding it into machine learning models, or using it in applications like search engines and recommendation systems.
In the context of a RAG pipeline, embeddings allow the system to quickly retrieve information related to a query by comparing the numerical representations of the query and the data it has, finding the most relevant matches.
This is closely linked to one of the most complex part of RAG pipelines in general, how to chunks your text and why chunking strategy is so important.
What is a vector store ?
A vector store for large language models (LLMs) is essentially a database or storage system designed to efficiently store and retrieve vectors. Basically, it allows to store the embeddings generated (as vectors) in a way that simplify usage. It should be able to:
- store vector in an effective way (in size and cost)
- allow efficient semantic retrieval (you give it the embedding of your question and it should give you the N most close embeddings)
- be able to scale (adding more and more data inside should not degrade its performance, or at least not too much)
Why is a Chunking strategy so important?
Chunking involves breaking down large texts or datasets into smaller, more manageable pieces or “chunks.” It is an essential part of RAG:
- Improved Efficiency and Scalability: By breaking down data into smaller pieces, LLMs can handle information more quickly and efficiently. It will then allow to create for a more scalable system as we will only retrieve the most relevant piece of information, whether you have 5MB or 5TB of data.
- Enhanced Accuracy: Chunking allows the model to focus on smaller sections of text at a time, which can improve the accuracy of the retrieval and generation process. It ensures that the model isn’t overwhelmed with too much information at once, which can lead to a loss of relevant details.
- Contextual Relevance: In RAG systems, chunking ensures that the retrieval component fetches the most relevant information by focusing on specific segments of text. This targeted approach leads to more contextually relevant and coherent outputs from the generation phase.
Here’s a concrete example of analysing a customer review on a smartphone:
Overall, I’m quite pleased with my purchase of the XYZ Smartphone. The screen clarity is outstanding, offering vibrant colors and sharp details, making my viewing experience enjoyable. However, I’ve encountered issues with the battery life, which doesn’t last as long as advertised, often needing a recharge by midday. The camera quality is impressive, capturing high-resolution images even in low-light conditions. The phone’s design is sleek and comfortable to hold, but I find the placement of the power button awkward, often pressing it by accident. On the software side, the XYZ Smartphone runs smoothly, with no lag when switching between apps. The audio quality during calls is clear, but the speaker could be louder for media playback.
Question 1: How is the screen quality of the XYZ Smartphone?
Question 2: What are the customer’s thoughts on the smartphone’s battery life?
Without Chunking (Processing the Entire Text):
- The model might focus on the overall positive sentiment expressed at the beginning and end of the review, potentially providing a generalized response like, “The customer is pleased with the smartphone, enjoying its screen clarity and smooth software operation.”
With Chunking (Splitting the Review into Relevant Sections):
- Chunk 1: “The screen clarity is outstanding, offering vibrant colors and sharp details, making my viewing experience enjoyable.”
- Chunk 2: “I’ve encountered issues with the battery life, which doesn’t last as long as advertised, often needing a recharge by midday.”
Answer to Question 1 (Using Chunk 1):
- “The screen quality is described as outstanding, with vibrant colors and sharp details, enhancing the viewing experience.”
Answer to Question 2 (Using Chunk 2):
- “The customer has issues with the battery life, noting that it requires a midday recharge and doesn’t last as advertised.”
As you can see, chunking allows to find the most relevant piece of context to be injected to the context of a prompt so to give the best answer. This is just a simple strategy using embeddings. There are more complex strategy that uses multiple type of chunking strategy at the same time for maximum relevance.
This is where you will use the most time, with the nitty-gritting of the chunking. This is literally the make-or-break moment of your use case.
What is Langchain and why it is so useful ?
Langchain is a framework designed to facilitate the creation and deployment of applications powered by large language models (LLMs). It provides a modular set of tools and integrations that allows easier integration of LLMs with the ecosystem. Basically, it allows you to create chains (or pipelines) which are sequence of multiple tasks and connections to a wide variety of systems.
Here’s some possible use cases with Langchain:
- Connect to Google search and your own vector store and send a mail to with the news of each field to your clients
- Analyse meeting videos to get the text and put it inside a vector store and create a knowldege graph and have a living documentation
- Have a chat where you can ask to do something and it will automatically choose which service to leverage and launch process, for example for ticketing system
The use case I writed about are only the tip of the iceberg and this is possible only because of Langchain’s wide integration and chain like system.
What is Streamlit ?
Streamlit is a popular open-source application framework specifically designed for machine learning and data science (and so LLMs). It allows developers to create beautiful, interactive web applications quickly without any frontend code, only python code.
You can literally have an app in 2 min and there are multiple ready-made components and particullary a chat component.
Now let’s implement our own RAG application.
Pre-requisites
- a functional Python coding environment with python and an IDE (VSCode for example).
- an OpenAI account with some credits (this is different from ChatGPT as we will use the LLM service API instead of using ChatGPT).
Initialize the work environment
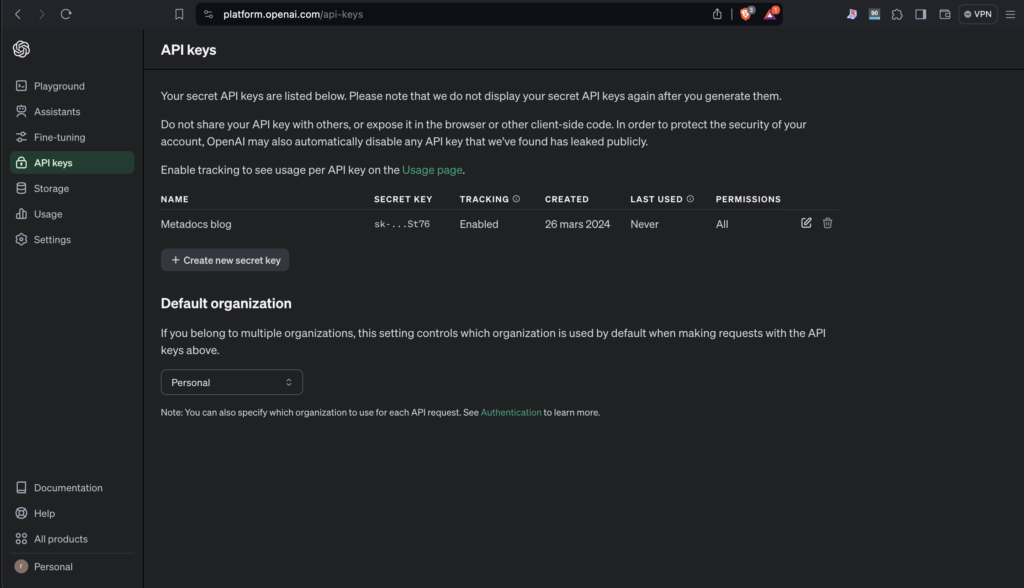
Setup the OpenAI API key
To use the OpenAI GPT models, we need an API key. An API key is just a file that is created to use a service, in this case OpenAI and it contains credentials.
So if you don’t have one, create an API key for this use case and save it somewhere (don’t worry we will use it in the next part and save it securely).
Pro tips: don’t hesitate to create one API key per use case as it will be easier to monitor what is happening.

Prepare the python environment
We are going to use python for the coding. It is a sure choice for all LLM related use case and all LLM frameworks supports it.
We will use pipenv to create a virtualenv for this project. Creating a virtualenv is very important as it will make sure this project will run without harming your other ones.
Also please remember to always save your code using for example github.
Install pipenv
Let’s begin by installing pipenv, which will handle virtual environments and Python packages for us (there are others like poetry, but they are more difficult)::
pip install pipenvCreate a folder and add dependencies
Let’s create a folder that will contains the code:
mkdir RAG-pipeline-langchain-openai
cd RAG-pipeline-langchain-openai
And add all required dependencies. We will install:
- langchain (the one and only)
langchain-openaiwhich contains the related OpenAI helpers for langchainstreamlitfor the easy application prototyping-
python-dotenvwhich will allows us to handle the OpenAI api key. There are many other ways but this is simple and powerful. faiss-cpu: this will be the cpu version of the vector store we will, FAISS. There is also the GPU version but I don’t think everyone got one on their rig.
pipenv install langchain streamlit langchain-openai python-dotenv faiss-cpuCreate the smallest Streamlit app
Let’s begin writing some code. We will work on iteratively and feature by feature with some testing between. We will the most simple streamlit application
Pro Tips: Iterative is the way to go in any software project. If we compare to building making, it is just making stuff, small part from spart, from the bottom and just checking that what you just made is robust enough. Simple right ?
Create a file called app.py and put this inside:
# Import the Streamlit library
import streamlit as st

# Write a simple message to the app's webpage
st.write('Hello, Metadocs readers!')
Now let’s run the code to make sure it works fine. Open a terminal to where the main.py file is and type this:
pipenv run streamlit run app.py
This will open up a browser pop with your application and it just took 2 lines of code !


Add the OpenAI api key
Now we need to add the OpenAI api key so that we can actually use OpenAI GPT4 model.
To do that you need to:
- create a
.envfile next themain.py and put your api key inside like this:OPENAI_KEY=sk-XXXXXXXXXXXXXX - create a
.gitignorefile at the same location add inside:.env. This will allow you to not commit your api key in your github repository (unless you want it to be used and have gigantic bills to pay). - Now you can add the following to the
app.pyto load the env var and you are good to go:
from dotenv import load_dotenv
import streamlit as st # This is from before

# Load the variables from .env and particulary OPENAI_KEY
load_dotenv()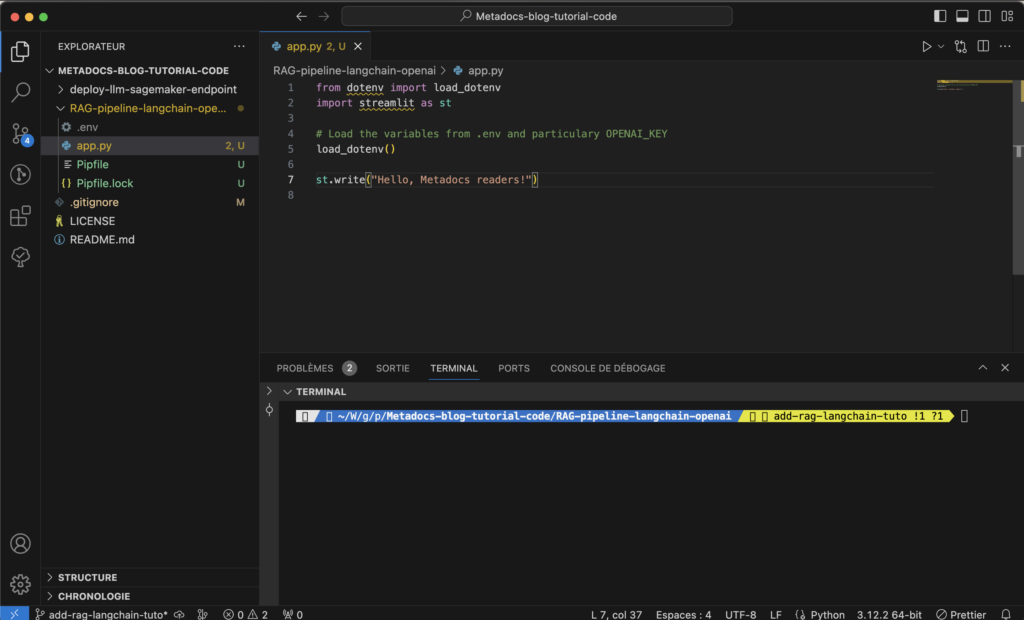
Add GPT4 inference
Now let’s add some GPT4 inference to the app. We will begin by asking a question and showing the output in the app.
import os

from dotenv import load_dotenv
import streamlit as st
from langchain_openai import ChatOpenAI
from langchain_core.prompts import ChatPromptTemplate

# Load the variables from .env
load_dotenv()

st.write("Hello, Metadocs readers!")

template = """Answer the following question
Question: {question}
"""

prompt = ChatPromptTemplate.from_template(template)

model = ChatOpenAI(temperature=0, model_name="gpt-4", openai_api_key=os.environ["OPENAI_KEY"])

result = model.invoke("What is langchain framework in the context of Large Language Models ?")

st.write("What is the langchain framework in the context of Large Language Models ?")
st.write(result.content)
Okay, this is a pretty big step so I will explain everything bloc by bloc.
import os

from dotenv import load_dotenv
import streamlit as st
from langchain_openai import ChatOpenAI
from langchain_core.prompts import ChatPromptTemplate
This is the import part. Here’s what it does:
osis a system library (so already available in python) to handle many low level stuff. We will use it to get the api key from the environment variables.from dotenv import load_dotenv: This is for handling the API key and using streamlit to create the appfrom langchain_openai import ChatOpenAI: This is the class that will interface between our code and the GPT4 model.from langchain_core.prompts import ChatPromptTemplate: This is the class that allow us to create the prompt to send to the LLM. We create what is called template that are just some prompt but with some parts that needs to be filled later on.
# Load the variables from .env
load_dotenv()
We load the variable inside the .env as environment variables. Using environment variables is a good way to pass values inside the code without writing it in the code directly.
template = """Answer the following question
Question: {question}
"""

prompt = ChatPromptTemplate.from_template(template)
Here’s the interesting part. We create the template that will be used to generate the prompt. In this case, I only ask the chat to answer my question.
Pro Tips: you see how I’m super descriptive in the prompt on what I want the LLM to do ? This is how to do good prompting. You image you are talking to someone who does not know of the subject at all.
model = ChatOpenAI(temperature=0, model_name="gpt-4", openai_api_key=os.environ["OPENAI_KEY"])

result = model.invoke("What is langchain framework in the context of Large Language Models ?")

st.write("What is the langchain framework in the context of Large Language Models ?")
st.write(result.content)
And finally we ask our question:
model = ChatOpenAI(temperature=0, model_name="gpt-4", openai_api_key=os.environ["OPENAI_KEY"]): here we create the interface to OpenAI by giving the model id we want (GPT4) and giving the api key.
The temperature parameter controls the model’s creativity (between 0 and 1, like 0.3).. Here, we want it to no be creative at all and be factual.result = model.invoke("What is langchain framework in the context of Large Language Models ?"): we finally ask our question and put the output inresult.- `st.write(result.content)`: we just write the result in the app.
Here’s what you will have:
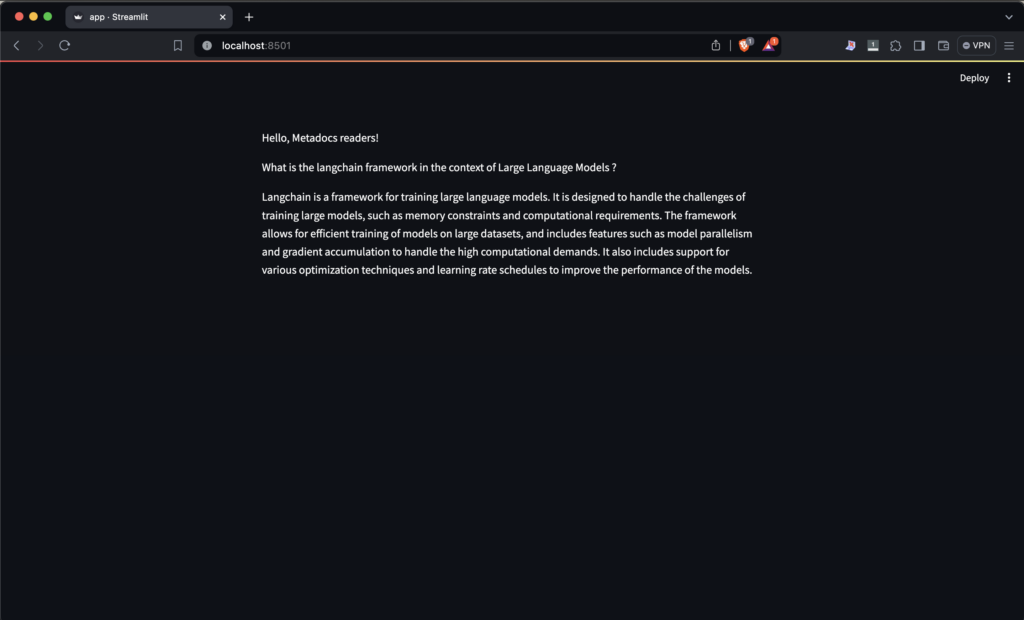
You can pat yourself, you already have an application connected to a GPT4. Now we will add the RAG part.
Add a streamlit upload component
Now we will add a component to load a text file with streamlit. We can do it with just one line. Fantastic, right ?
uploaded_file = st.file_uploader("Choose a text file", type="txt")

if uploaded_file is not None:
    string_data = uploaded_file.getvalue().decode("utf-8")
Chunks the text with the simplest strategy
Now that we can upload a text file, we need to split it so that we can use it. This part is actually the most complex because:
- we are always going to use very clean data to test. In the real life, you will have very complex files with very different formats.
- we will use the simplest chunk strategy that consists only to split by line. In real use case, this will not always works as a line is too small in most the case and you will miss data.
Now that I have warned you enough, let’s do the chunk strategy:
splitted_data = string_data.split("\n\n")Yes this is super simple. And yes, it will never work on actual data. This is just for the tutorial.
Use the simplest vector store
We will use the FAISS vector store, which was created by Meta, and it stores embeddings in-memory. If we were not using this, we would need to deploy or pay for a vector store.
Pro Tips: use FAISS only for tutorial and demo. For real application, it is not enough by itself and you should use a real vector store.
Let’s add a FAISS vector store then:
embedding = OpenAIEmbeddings(openai_api_key=os.environ["OPENAI_KEY"])

# ... rest of the code

vectorstore = FAISS.from_texts(
    splitted_data,
    embedding=embedding)
retriever = vectorstore.as_retriever()
Here’s the breakdown:
embedding = OpenAIEmbeddings(openai_api_key=os.environ["OPENAI_KEY"]): this create the class that will interface between our code and the OpenAI model for generating the embeddings.vectorstore = FAISS.from_texts ...: this will create the in-memory vector store using the splitted text. We give the embedding interface so that it can use the OpenAI embedding model to generate embedding from each split into vectors.retriever = vectorstore.as_retriever(): this will create an interface so that you can retrieve chunks from you vector store.
Now let’s modify the prompt template
Modify the prompt template for RAG
In a RAG use case, the prompt will not only use the question you want to ask but also the context that semantically match your question.
Here’s the corresponding prompt:
template = """Answer the question based only on the following context:
{context}

Question: {question}
"""
Create a langchain chain to connect all components
Now let’s connect all the components and with a langchain chain. A chain
from langchain_core.output_parsers import StrOutputParser
from langchain_core.runnables import RunnablePassthrough

# ... rest of the code

chain = (
        {"context": retriever, "question": RunnablePassthrough()}
        | prompt
        | model
        | StrOutputParser()
)
This is another mouthful so let’s explain this too:
StrOutputParserandRunnablePassthrough: these class are only there only to elegantly output the result in text and pass the argument through the chain.|: this operator signify that you give the output of the left side to the right side and so you create a chain. This could be done directly by calling the function of each components but it is more elegant like this right ?- What is happening is that we are just passing the context which is the retrieved chunks from the vector store and the question to the prompt template.
- Then the template will generate the complete prompt that will be sent to the LLM model
- Finally the output of the LLM model is transformed into text.
Add components to ask a question
Now that we have a working chain, let’s connect everything to a way to ask a question directly in the app. Again, we will use the sheer simplicity of Streamlit.:
question = st.text_input("Input your question for the uploaded document")

result = chain.invoke(question)

st.write(result)
Let’s explain this:
question = st.text_input: this create the components to ask the questionresult = chain.invoke(question): this will launch the chain with the inputed questionst.write(result): this will write the output to the app.
Look at all this code
Ok, now all the code has been writed. Here’s what it should look like:
import os

from dotenv import load_dotenv
import streamlit as st
from langchain_openai import ChatOpenAI, OpenAIEmbeddings
from langchain_core.prompts import ChatPromptTemplate
from langchain_community.vectorstores import FAISS
from langchain_core.output_parsers import StrOutputParser
from langchain_core.runnables import RunnablePassthrough

# Load the variables from .env
load_dotenv()

st.write("Hello, Metadocs readers!")

template = """Answer the question based only on the following context:
{context}

Question: {question}
"""

prompt = ChatPromptTemplate.from_template(template)
model = ChatOpenAI(temperature=0, model_name="gpt-4", openai_api_key=os.environ["OPENAI_KEY"])
embedding = OpenAIEmbeddings(openai_api_key=os.environ["OPENAI_KEY"])

uploaded_file = st.file_uploader("Choose a text file", type="txt")

if uploaded_file is not None:
    string_data = uploaded_file.getvalue().decode("utf-8")

    splitted_data = string_data.split("\n\n")

    vectorstore = FAISS.from_texts(
        splitted_data,
        embedding=embedding)
    retriever = vectorstore.as_retriever()

    chain = (
        {"context": retriever, "question": RunnablePassthrough()}
        | prompt
        | model
        | StrOutputParser()
    )

    question = st.text_input("Input your question for the uploaded document")

    result = chain.invoke(question)

    st.write(result)
With just 50 lines of code, you have a working RAG application. Let’s test it shall we ?
Test our beautiful DIY RAG application
Here’s some advice to test the application;
- use this link to get the text file to input. Download it in your laptop.
- Launch the app and really explain what you want in the prompt. If your answer is too short, don’t hesitate to ask to do it in 5 lines.
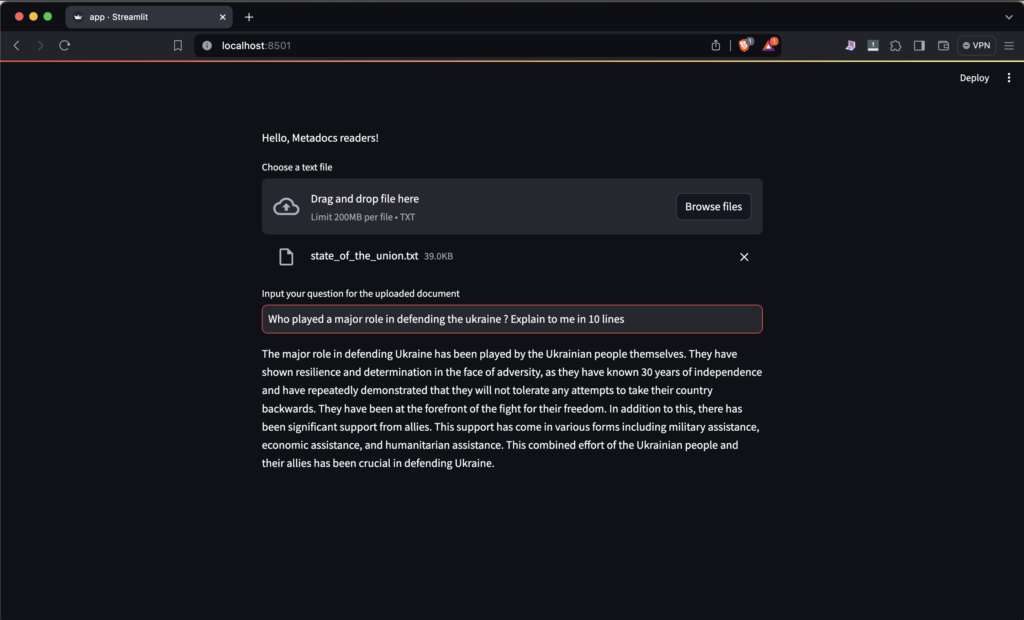
- You can use the following question to begin with:
Who played a major role in defending the ukraine ? Explain to me in 10 lines
Let’s begin then. Launch the application:
pipenv run streamlit run app.pyNow load the given text file and ask the question. TADAAA:
Conclusion
Congratulation, you created your own RAG application so fast. You are really good you know !
But I need to warm to something before you continue to play with the app:
- This is really a super simple application where for example the splitting is super simple and will not work on other files
- It accepts only text so a good feature would be to add pdf inputs.
- Be careful when launching the application (or reload the tab) as when you are uploading a file, the chain will create the embedding which will cost money on the OpenAI side. This whole tutorial cost me 0.09$ but be careful if you are using it more heavily.
- You can find all the code here, don’t forget to star the repo.
Afterward
I hope this tutorial helped you and taught you many things. I will update this post with more nuggets from time to time. Don’t forget to check my other post as I write a lot of cool posts on practical stuff in AI.
Cheers !